 Hello! Welcome to the 3 Week of a Handmade Christmas. The gift idea that I am going to share with you today is one I learned how to make fairly recently and really like! To me it is perfect in so many ways: 1. It uses for the most part materials that are free. 2. It is useful (a big plus in my book!). 3. It is a fairly quick project. 4. It is fun to make and 5. It looks nice.
  Baskets! Made from..... can you guess? ..... Paper grocery bags! They are sturdy and durable and would be fine to use as a gift all by themselves but it is also fun to use them to make gift baskets.
  Gift baskets are a great gift for a host and hostess, parents or really whoever.
 In my little sample basket I stuck homemade bread, homemade granola, jam, a flower and a bow. Everybody eats but many people don't take the time to make homemade baked goods but they enjoy them anyway. This sort of thing is especially nice for the person who "has everything".
Here are some other gift basket ideas:
- My friend Emily has a bunch of neat ideas on her left hand sidebar for kits or gift baskets.
- A bunch of homemade gift basket ideas
- Or copy the ideas of the professionals.
But anyway, on to making a basket.....
 What you need. 6 paper grocery bags that are all the same size, a good scissors, stapler, clothes pins and tacky/fast drying glue.
  You will also want a brown acrylic paint and a clear polyurethane. (you can also use a clear spray on finish but I used what I had)
Step 1. Carefully pull the back seam apart and then cut the bottom out. You will not use the bottom pieces.

Step 2. Take 3 of the bags and fold them in quarters and cut along the lines. (as shown above.)
This will give you 12 of these pieces. (You only need 11 of these.)

Step 3. Take each of those pieces and fold them in half lengthwise.
Step 4. (pictured above) fold each edge into the middle.

Step 5. Again fold the the outside edges into the middle.
Step 6. Fold along the middle line.
 Step 7. Then run the strip along a sharp edge so that it is carefully creased. At this point you need to make sure all of your strips are exactly the same length and trim off any possibly differences.
Step 8. Now take the remaining 3 bags and cut them in half the long way. (fold them first to get a good line) You will have 6 long strips.
Step 9. You will need to cut the long strips a little shorter. To determine how short you need to measure the width of your short strip. To the width you need to add 1/8 - 1/4 inch and then times that by 22. Then add 1 inch to that number for overlapping. That will be how long you need your long strip to be. Mine ended up being 30 inches long but since bags can vary in size, the strip length will vary as well.
Step 10. Do steps 3-7 to five of the long strips.
 Step 11. Form one long strip into a circle, overlapping one inch. In the overlap stick one of the short strips firmly up to the top. Staple in place.
Step 12. Leaving about 1/8- 1/4 inch space in between each strip, insert and staple in as shown above.
 Step 13. Find the middle strip (number 6) and cross it over as shown and staple it in place next to the first strip.
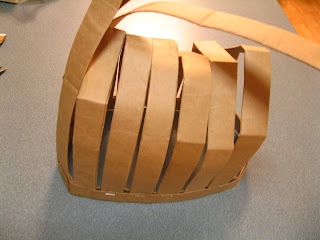
Step 14. Do the same thing with the next 5 strips, until it looks like the picture above.
 Step 15. Now with the 5 strips that are left loose you want to weave them across the bottom and staple them in the other side. The picture above shows the first strip being woven.
 Here is the 2nd strip being woven. You need to make sure you are weaving them opposite of each other. For example with the first one I went over, under, over, under...., with the second one I went under, over, under, over.....
After that is completed you will have all the short strips stapled into the band, the bottom will be woven and the band should be filled up. (you have 1/8 - 1/4 inch spaces in between each strip but their shouldn't be any spaces bigger than that.)
 Step 16. Now we are ready to weave the sides using the 4 long strips that you have folded. Take your first strip and start at the bottom making sure to weave opposite of the bottom weaving.
 Step 17. You should have 1 inch of overlap once you have made it around the basket. Open up one end of the strip, put glue inside and then stick the other end of the strip in their. Press it tightly and then secure it (for now, until the glue dries) with a clothespin.
 REPEAT steps 16 &17 with the other 3 strips. The picture above shows the gluing process. If possible I like to how those overlapping edges of the strips woven to the inside.
 Step 18. Take you last unfolded long strip. Do steps 3 & 4 on it. (Where you fold it in half and then fold the outside on both sides into that half line. ) Then instead of folding it again completely in to the middle line (like step 5) you instead fold it in about 2/3 of the way to the middle line. As pictured above. Then fold it back in half (along you fold line) and crease it along the edge of your counter (Step 7).
 Step 19. Now open it up again and fill the inside of the strip with glue and then place over the top band of the basket that you did all the stapling to and cover up that stapled band. (That is why this strip is made wider- so it can cover up all those staples and the underneath band completely.) Clothespin it so that it stays in place while the glue is drying.
The main portion of the basket is now finished!

Step 20. If you want handles you can make some more strips like the shorter ones but cut the ends so they are round. You could have one or two handles (for two you might need another bag)
 Step 21. Then put glue inside them (like you did for the outside top band on the basket) and then just glue it together. Lay it aside. You will put this on after the painting and sealing is done.
Step 22. Take your acrylic paint and mix one part paint with 3 parts water. Paint the complete basket (inside and out- you might want to do one part and then come back later and do the other) and the handles. For acrylic paint you can choose whatever color you want but I prefer the rather reddish brown, but I am thinking it might be fun to try a different sort of color like blue sometime too.
Step 23. After it is completely dry do the same thing with the clear polyurethane. This makes it very sturdy and washable (not like in a sink full of water washable but with a rag or I guess even spraying it with water).
If you don't have handles you are now done!
 Step 24. First drill holes (using a drill or just poke it with a nail) through the end of the handles and the side of the basket where you want to the handles to connect.
Step 25. Affix the rivets. You insert the rivets, position the top and hammer together.
 And there is your basket! All ready to be given away or used by you.
 Here is a picture with the handles up.
Now it is your turn! Please join me and share your handmade ideas!
To link up~
~Write a post about anything you are doing that is handmade for Christmas. (Gifts, decorations, food, etc.).
~In that post please link back to here.
~Then using MckLinky, add your link to the list. Please make sure it is linking to your specific post (not just your blog).
~Then have fun following the links to see other's great ideas!
Just a reminder, We will not be doing this next week as it is Thanksgiving. I hope you all have a wonderful Thanksgiving and then come join me again for the 4th week of A Handmade Christmas on Dec. 3rd.
I am sorry this is late getting up. I am having a few troubles with it (actually with my lack in computor skills ) today.


