Project time Tuesday

 Other than working on doing the hand quilting on our quilt (and arranging flowers) I haven't worked on many inside projects lately. My time has been very much concentrated on gardening and a little beekeeping too. But I hadn't gotten around to writing about some of the things I made for a silent auction in early May so here are some pictures of projects I had fun doing then.

 ~A set of cards.  I had a bunch of fun using my heart and paisley punch and then some various scrap paper (It was all stuff recycled from other things) to make flowers with and I glued them on simple cardstock cards.
 I also made a stationary set with stamps. The box they are in was actually one of my "dumpster diving" finds from one of our trips to the university after school was done for the summer.
 A garden kit. I had been given the peat pots from a gardener friend that didn't care for them. I discovered I didn't like that much either and there were still a couple of unopened packages. I also potted some plants and added some gloves that I bought on sale for 25 cents. I cost me pretty much nothing to put together but raised some money.
My breakfast kits was a big hit at the silent auction. It included: A pancake mix, granola, coffee buns, maple syrup and jam all made by me as well as a little package of coffee.

All of the projects raised money and they were fun for me to make/ put together. It was fun to see that people did really like them and made me think that gifts like that might be appreciated.

Have you been working on any projects lately?

Ready Stocks - Musical Inchworm


The Lamaze Musical Inchworm is full of surprises for baby to discover. Squeeze the nose to hear a fun song. Textures and sounds encourage exploration, while bright colors promote visual stimulation. This little worm can help make tummy time fun! And, use the ruler on the Inchworm's tummy to track baby's growth.

Size (LxWxH / WT):
24.00 " x 3.50 " x 2.63 " / 0.40 lbs

Lamaze Musical Inchworm
Price : RM 35/pc
1.Available
2.Available
3.Available

Interested?
sms : 016-6835083 Pn Ida
email : ida_haikal04@yahoo.com

Ready Stocks - Kerry the Fairy


Kerry the Fairy will flutter with you everywhere...her portable clip means take-along fun "on the fly". This plush toy's interactive features include a multi-colored rattle and crinkle wings for endless discovery play. High-contrast patterns stimulate vision. Perfect for baby's first doll.

Size (LxWxH / WT):
7.50 " x 2.50 " x 7.50 " / 0.20 lbs

Kerry the Fairy
Price : RM35/pc

1.Available
2.Available
3.Available

Interested?
sms : 016-6835083 Pn Ida
email : ida_haikal04@yahoo.com

Ready Stocks - Marina the Mermaid

Marina is full of developmental features that capture baby's imagination and stimulate her senses. She has fun, flowing hair, a rattle star and seahorse teether.
Her mermaid's tail has fun, feathery fabric and a peek-a-boo mirror.


Size (LxWxH / WT):
6.00 " x 2.25 " x 10.00 " / 0.25 lbs

Marina the Mermaid
Price : RM35/pc
1.Available
2.Available
3.Available

Interested?
sms : 016-6835083 Pn Ida
email : ida_haikal04@yahoo.com

Ready Stocks - Toys


Activity Soft Box
Price : RM38/pc
1.available
2.available
3.available

Interested?
sms : 016-6835083 Pn.Ida
email : ida_haikal04@yahoo.com

What's going on on the blog?!

Asalamu Alaikum,

InshAllah, I am going to be going through old posts to add labels, and am rearranging the blog a bit to try and make it easier to read and to find stuff. So please excuse any old posts that may show up in your blog feed, and please ignore the mess while I redecorate! :-)

Pleated Belt Shalwar w/wide leg-Part 3

Asalamu alaikum,

After finishing up all the pleats we will now attach the belt and finish up our shalwar.


Step 1

With the right sides facing sew a half inch seam in the belt pieces of your shalwar.
Step 2

Fold over the seam allowance and sew a line of stitches 1/4 of an inch away to secure the seam allowance.


Step 3
With the right sides of the legs together, sew the center back seam of your shalwar.
It should look somewhat like this.
Step 4
Take one end of the belt and place it on the top of the leg pieces, the right side should be facing each other. The belt should be half an inch to the left of the center seam(this will be the center front seam allowance of the belt).
Pin the belt in place all around the legs, the center back seam of the belt and shalwar should be roughly at the same point.
What it looks like when you have finished pinning in place. The centerfront of the belt should over lap by half an inch for the center front seam.

Step 5
Sew from the center front seam of the legs around the shalwar and back to the front. Then sew up the center front seam of the belt, stopping 1.5 inches from the top(to leave a space for the drawstring.

Here is the belt attached to the legs.
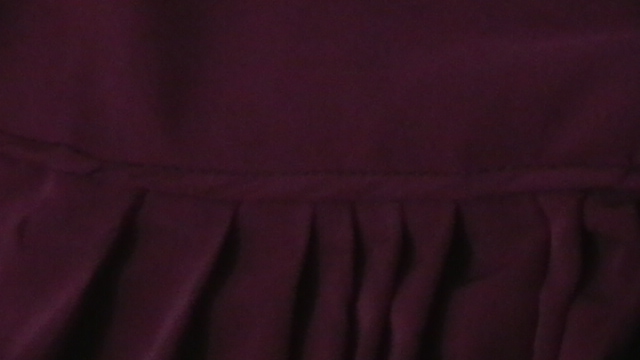
Step 6
Now sew a line along the bottom of the belt to secure the seam allowance, it should be facing upwards.
Step 7
At the center front seam of the belt, fold the seam allowances away from the center by 1/4 inch and then fold the over 1/4 inch again. Sew a line down one side across the center seam and up the other side, this will be the opening in your drawstring casing.
Step 8
Starting at the openingyou made above, fold the top of the belt over by 1/2 an inch towards the wrong(inner) side.

Step 9
Fold it over by another inch to form the drawstring casing, do this all around coming back to the opening. Pin in place, and then sew a line of stitches all around on the bottom of the casing.

Step 10
On the wrong side of your shalwar, fold the leg in half and measure out along the hem from the fold 7", and mark, this is your foot opening.
Step 11
At the center crotch seam mark up 1/2 inch.

Step 12
Keeping the shalwar folded in half mark a lin from the foot opening to the center crotch seam, one inch away from the edge of your fabric. Do the same on the other leg. Sew the seam, starting at one foot, going up the leg to the center seam, and then down the other leg.

Now your shalwar is completed, give it a good pressing and it is ready for wear.

Front view of the finished shalwar

Back view of the pleated shalwar.

End of Part 3 for any questions please leave a comment.

Boston got their first win...two to one for Canucks

Another nice evening with Marilyn and Michael...The Canucks had a bad game but let's see what happens on Wed....then again Friday...what a week for hockey.
At least the final game for the Stanley Cup will be in Vancouver...Go Canucks Go.


Herbs for our Homestead


Spring is a very busy and fun time for homestead activities. Planting, bee care, baby animals (if you have them), lots of milk and eggs and much more. Though we don't have much in the way of animals at our place we still keep pretty busy. Gardening is a big priority right now. I thought I would write today about the herbs at our place.

 My interest in herbs goes back quite a ways. When I was around 13 I started an herb garden at my parents place (my place then as well). I had fun growing and drying quite a few things. At that point I didn't really know how to use herbs to their full potential but I was starting to learn.

  After that I went to college, got married and started a family. Herbs were pretty much forgotten about for a while. In the last few years I have started to get really interested in them again. As I grow them and study up on them it is fascinating to learn about the amazing plants that God has made. In simple little plants there is not only the ability to make our food taste very yummy but also healing properties as well. It is so awesome to realize again and again how God so perfectly planned everything- down to having a special plant or herb for every physical problem (at least it seems like that to me) we might face.

  I now have one section of my garden devoted to herbs. I am still in the learning process concerning using them all to their full potential but it certainly is a fun journey! I am also starting to put more herbs in my flower beds as well as learning about herbs that grow wild in our woods and yard.
Here are some of the herbs we have at our place:

 Some that are established and came up right away this spring are:
Some that we are planting this year (either because they are annuals or because we are just getting them started) are:
  • Basil (more info here)
  • Coriander/Cilantro (more info here)
  • Rue (perennial)
  • Hyssop (though this already grows wild in our woods- I am trying to recall why I decided to buy seed for it!) (perennial)
  • Stevia
  • Lemony Catnip (perennial)
  • Borage
  • Lavender  (perennial- though it only is for -10 degrees, I am hoping it will stay alive for us)
  • Dill
  • Garlic
Lavender- I bought it already growing.

I have a post on harvesting and using herbs here that you may enjoy.
We are already using some of the herbs this year and I am looking forward to using them all summer and then preserving more for winter use. I hope to do a lot more studying up on them and can't wait to find out more about this marvelous creation of our wonderful and wise God!

Twirly Knit Skirt


A few months ago, I knit this twirly skirt for Charlotte from a great cotton blend yarn. She loves her skirt and makes sure to twirl often.


The pattern (Twirly Skirt on Ravelry) was written to be knitted flat but I knit it in the round by doubling the stitch count and knitting on circular needles. The yarn (Wildflower D.K. from Plymouth) is 51% cotton and 49% acrylic which makes it cool for summer and very durable and washable. I knit the size 6 in stitch counts but used the size 10 for length since Charlotte's pretty tall and I wanted her to be able to wear it for more then one summer. I finished the bottom by knitting about 10 rows of garter stitch instead of hemming it.

It's a super easy but long knit. It's a lot of rows of stockinette stitch which can be boring for some but I found it very relaxing. It was the perfect mindless, movie-watching knitting.

Pleated Belt Shalwar w/wide leg-Part 2

Asalamu alaikum,

After you have sewn your leg pieces together, we will start the hem of the legs.

You will need two pieces of heavy weight interfacing or buckram. They should be 1"x16".


Step 1

Center the buckram on the wrong side of the bottom of the leg opening, about half an inch up from the edge.
Step 2

Fold the half inch of fabric up over the buckram, you can sew one line of stitches along the edge to hold it in place if you like.

Step 3
Fold the buckram up one inch, so that is completely enclosed in the fabric, if you have not sewn a line of stitches to secure it then you may like to pin it in place now.

Step 4
Sew anywhere from 2-10 lines of stitches running perpendicular to the bottom of the leg opening. The minimum is one line at the very top edge of the buckram and one at the bottom.


A bit difficult to see but on this shalwar I sewed 6 lines.


Step 7
Place the two leg pieces with right sides together and sew only one of the crotch seams, this is the center front.

Step 8

Make a "knife pleat", pinch about one inch of fabric on one side of the center seam and fold it over towards the seam, pin it in place.
Step 9
Do the same on the opposite side of the seam.


Here is what your first two pleats should look like.


Step 10
Continue making knife pleats(they should be overlapping by about 1/4 to 1/2 inch) that face the center seam until the distance between thecenter seam and the center of the rectangular center leg piece is about 5"-6", so the total width of the center pleated section should be 10"-12".

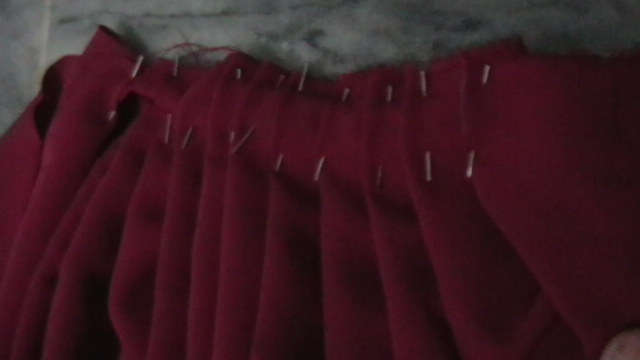
This diagram basically shows what you are trying to do, the center of the leg pieces should fall from your hip bones in a line down the front of your legs, so the area between points A and C should be roughly the distance across your hips, somewhere in the neighborhood of 10"-12"(can be more if you need it but not less).


Step 11
Sew a line of stitches to secure all the pleats in place, it should be between 1/4 to 1/2 inch down from the top edge.

On this shalwar I have made nine pleats on either side of the center seam, total of 18 pleats across the front.

Step 12
Now to make the pleats on the back side of the shalwar-lay it out flat, and make knife pleats that face away from the center back seam.


Step 13-
Pinch one inch of fabric, and then lay it flat, facing away from the center back seam, pin in place.

Step 14-
Make several pleats, until the distance from the center front seam to the center back is half the width of your belt. Do the same on the other side of the shalwar. On my shalwar I made 3 pleats on either side of the back seam for a total of 6 pleats.
Step 15
Sew a line of stitches to secure the pleats, in the same way as you did for the front pleats in Step 11.


Here is what you should have so far, the two leg pieces sewn together with a large section of pleats in the center and two smaller sections at either side(this will be sewn to make the center back seam).


End of part two, if you have any questions please leave a comment and let me know.